A. Introduction
This page sets the necessary values for app operation.

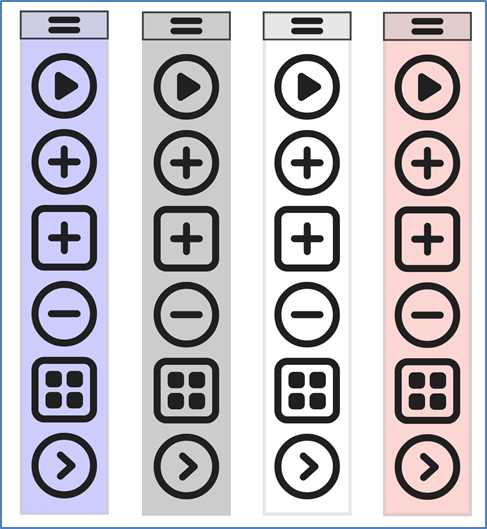
B. composition
The composition of this page consists of menu names on the left and menu values on the right.
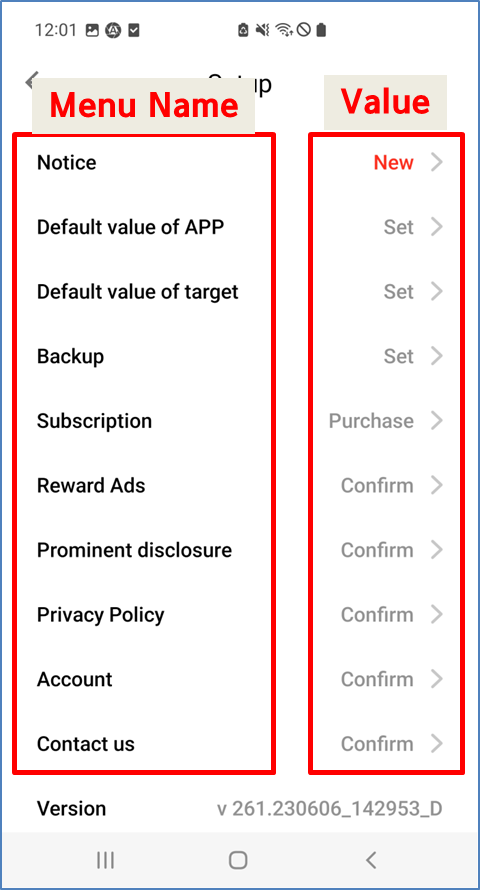
Click on each menu name to see a brief description of that menu as shown below.
If you press each menu value, you can execute the function or change the value for that menu.
C. Menu
1. Notice
This menu will notify you of changes, speed improvement, stabilization, etc. through the website link when updating the app.
Values in this menu Press the LINK button to switch to the homepage.
2. Default value of APP
Like the [Settings] page, the configuration of [Default value of APP] consists of menu names on the left and menu values on the right. Clicking the menu on the left provides a brief explanation, and clicking on the value on the right changes the value of that menu.
This menu sets the basic environment values of the app.
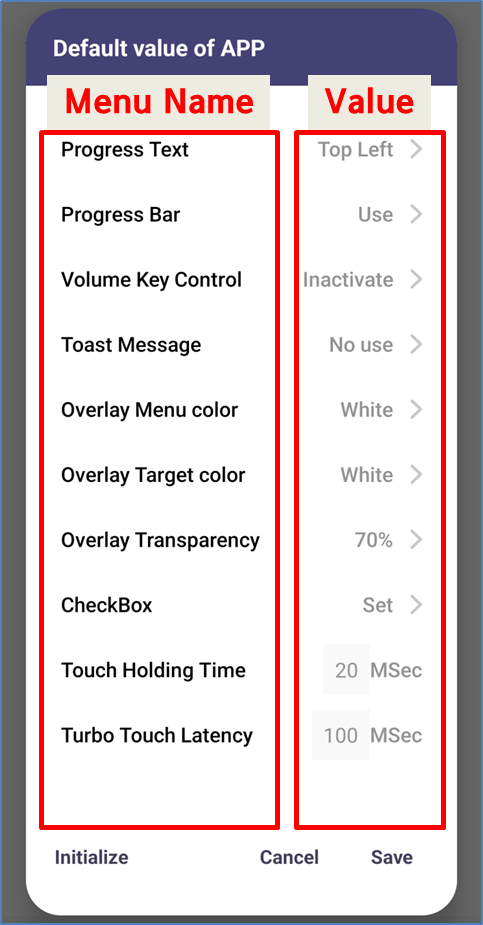
If you press the [Default of APP] - [Initialize] button at the bottom left of the above figure, the default settings will be reset when the app is installed.
Only the menu values in [App default settings] are initialized, and other settings are not affected.
2.1. Progress Text
As shown in the figure below, [Progress Text] represents the currently playing group and target number.
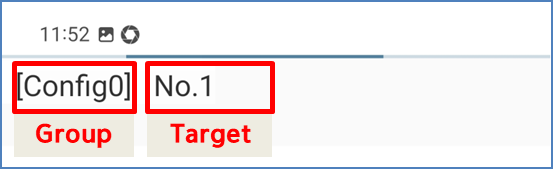
In this menu, you can turn on/off [Progress Text] or place it in [Top Left/Bottom Left/Top Right/Bottom Right] of the screen.
2.2. Progress Bar
As shown in the figure below, the [Progress Bar] shows whether or not playback is currently being played with a bar flowing from the top of the device.
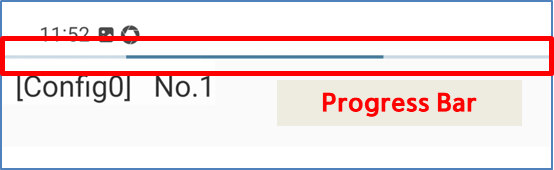
In this menu, you can turn on/off [Progress Bar].
2.3. Volume Key Control
There are two ways to load/play/stop a group: the app [Overlay Menu] UI or the volume key.
This menu is a setting for operating the app using the physical volume keys on the left or right side of the device itself.
If you play a group with volume keys, the app [Overlay Menu] UI will not be displayed.
The value of this menu is [Disabled], [Enabled], [Disabled], and if set to [Disabled], the volume key does not work.
The way to operate the volume key is as follows.
Volume up key (short): play current group (last called group)
Volume up key (long): show group load menu
Volume down key (short): Stop current playback
Volume down key (long): disable volume key control
Volume up/down keys simultaneously (long): activate volume key control
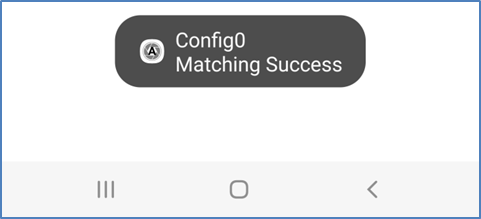
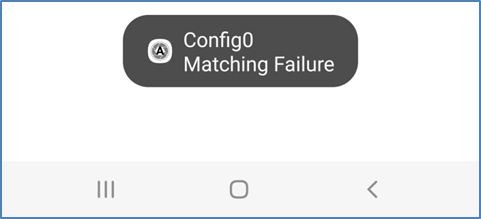
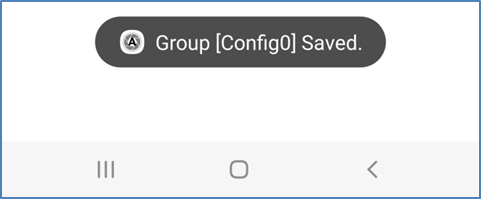
2.4. Toast Message
A toast message means a pop-up window that appears as white text on a black background near the bottom of the device, as shown in the figure below.
This menu sets whether to display "matching success" and "matching failure" on the screen when image matching succeeds or fails.
A toast message is also displayed when saving a group.
2.5. Overlay Menu color
This menu sets the color of the overlay menu.
The color can be set to blue, black, white, or red.
2.6. Overlay Target color
Sets the inner color of the overlay target.
The color can be set to black or white.
* When a group call is set, it is displayed in yellow regardless of the target color setting.
* The currently selected target is displayed with a blue border.
2.7. Overlay Transparency
Sets the transparency of the overlay menu/target color described above.
Transparency is not applied to the border, only the inside of the border of that UI.
Changing the transparency makes the UI background visible but also seems to change the UI color.
If the transparency is 0%, it means that the background behind the overlay is 100% invisible, and if the transparency is 100%, the color is not visible at all and only the background is visible.
2.8. CheckBox
Set the "Don't show me again" checkbox in the notification window.
2.9. Touch Holding Time
Just as a human touches the screen with their finger and releases it, the app also presses and releases the screen when performing a touch.
The touch maintenance time sets the time from pressing the screen to releasing it, that is, the touch maintenance time for holding the screen pressed.
* The minimum value is 10 ms.
2.10. Touch Latency
When image matching is successful, set the delay time from right after matching to just before touching the screen.
For example, if set to 100ms, the touch will be performed after waiting 100ms right after successful matching.
If you touch immediately after successful matching without setting the delay time, depending on the device, matching may be successful, but the touch may not work.
The touch delay time is a delay time immediately after matching, so it should be minimized in delivery apps that require a quick touch.
2.11. Fast stabilization time
Set the delay time from right after matching fails to just before starting matching again when setting the same capture target to be called again in case of image matching failure indefinitely.
For example, if you set it to 300ms, matching will be attempted again after waiting for 300ms right after matching fails.
If matching fails, if the same capture target is repeated infinitely without setting a delay time, the app may crash or the device may turn off depending on the performance of the device.
Therefore, please set the value after testing on each user's device.
2.12. Keep Screen On
This menu is to prevent the screen from turning off.
If [Progress Text] or [Progress Bar] is turned on during playback, you do not need to use this menu because the screen is automatically prevented from turning off.
You can use this menu only when you do not use [Progress Text] or [Progress Bar].
If [Always] is selected as the value of this menu, the screen is always on when the accessibility service is running, so be careful about battery usage.
3. Default value of target
The composition of this menu consists of menus on the left and values on the right, just like the setting page. Click the left menu to see a brief explanation, and click the right value to change the value of the corresponding menu.
This menu sets the default values for the common menus of General, Swipe, and Capture Target.
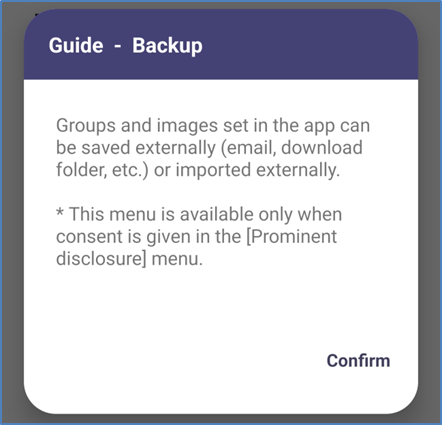
4. Backup
This menu compresses the group and image set by the user and delivers (exports) the backup file to the place the user wants or imports the backup file in the download folder.
When creating a backup file in the app, only groups and images are processed, and other information is not processed.
Also, only the user can perform a backup and the app itself cannot export user information to the outside world.
4.1 export
Backup files can be sent externally via email or the Quick share app for backup.
4.2 import
When re-importing the exported backup file, be sure to save it to My Files download on the device before proceeding.
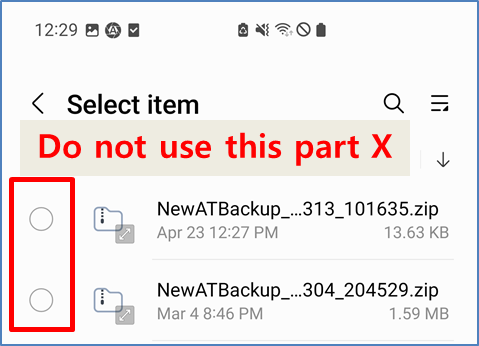
4.2.1 Incorrect import method
When importing, be careful not to import the file from the lower part.
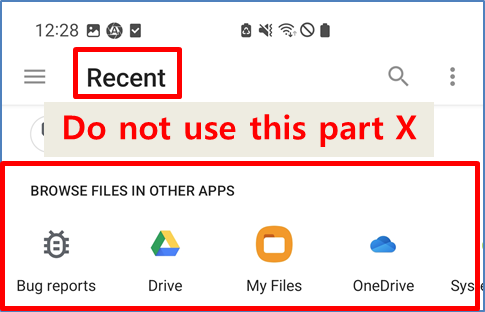
In the picture above, the red boxed part accesses the backup file through other apps, so you cannot import the backup file by clicking this part.
This app cannot access files through other apps and can only be accessed through the path provided by the Android system.
When accessing a backup file through another app, a radio button appears as shown in the figure below, and if the radio button appears, you cannot proceed with importing the backup file.
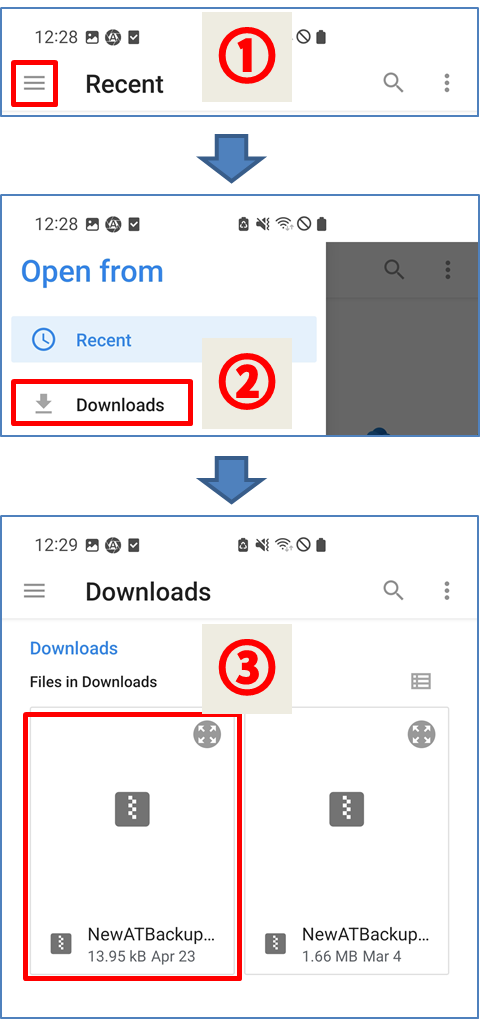
4.2.2 Normal import method
When importing a backup, be sure to import the backup through the following section.
5. Subscription
There are a total of five operation modes for the app [Basic/Unlimited Content/High Speed/Premium/Promotion].
Among these, unlimited content, high-speed, and premium packages are activated upon regular subscription.
Promotion mode is only active for a specific period when signing up with a new device or account and operates similarly to the high-speed package.
The current mode can be checked under the [START] button on the app's home screen or in the [Subscription] pop-up window in this menu.
6. Reward Ads
Earn coins by watching ads.
If you use a coin, matching is attempted at turbo speed when matching.
When matching is successful, 1 coin is consumed.
2 coins are rewarded for watching an ad.
The number of ads you can see per day is limited to a maximum of 5.
* Currently, there is a memory leak in Google SDK ads. (There was no memory leak until the previous Google SDK 19.8, but the leak occurred from version 20 and the contents were delivered to Google, but whether or not Google has the will to correct it... state and there is only a reward advertisement for coins)
* If you do not watch the advertisement, there is no memory leak, so please restart your accessibility or device after viewing the advertisement.
* Coins do not disappear unless you reinstall the app until matching is successful.
7. Prominent disclosure
Explains how to use the accessibility API according to Google policy.
8. Privacy Policy
In accordance with Google's policy, the [Privacy Policy] is explained.
9. Account
This is the Google account information connected to the server.
To prevent duplicate use, be sure to log out using this menu when changing devices.
If duplicate use is recognized, there may be restrictions on the use of this app.
10. Contact us
You can contact the developer by e-mail using this menu.
This information will never be shared or leaked externally, so you can feel free to contact us.
11. Version
This is the app version.
'Manual' 카테고리의 다른 글
| 6. Image page (0) | 2023.06.07 |
|---|---|
| 5. Group page (0) | 2023.06.06 |
| 3. Home page (0) | 2023.06.06 |
| 2. Permission page (0) | 2023.06.06 |
| 1. Basic Concept (0) | 2023.06.06 |


